
1. Roll a sheet of purple and a sheet of white. Fold both into triangle and form a square as shown.

2. Fold square in half and run through a pasta machine as shown.

3. Continue to fold and run through twenty to thirty times until you have a nice graduated effect. | |||
4. When the sheet is blended to your liking, fold in half once again and give a quarter turn. Now run through again. Fold in half again horizontally. Your sheet should look like this. See photo. | |||
5. Measure the sheet and mark it at 1 1/2" increments | |||
6. Now cut the sheet where you've marked it. | |||
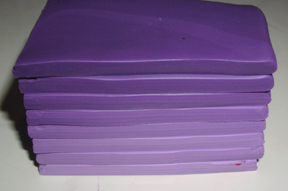 8. Lay the stack down as shown. | |||
 | |||
9. Place a ball of scrap clay at the end of the stack, preventing it from falling as you are slicing. Slice the stack vertically as shown. Make your slices as even as possible. As thick or as thin as you like. | |||
10. Take the slices apart one at a time. Roll tiny logs of white or contrasting clay and lay on your slices as shown. | |||
11. Alternate your slices as shown. I usually go every third slice. | |||
12. When you are finished, your cane/ slices should look something like this. | |||
13. Now you'll condense the log together and reduce it. Roll the log until it is 17" long. Cut one inch off each end. Now mark your 15" log at 1 1/2" increments and cut. | |||
14. Pinch each roll into a triangle or leaf shape. Notice I am holding my finger on the end of the log. This prevents the log from becoming even longer as I pinch. | |||
15. Line up your segments into a circle. Now you can see how big you need your center portion to be. 16. Choose two colors for your center log. Roll each into a flat sheet. Stack. Roll the two colors into a spiral. This will be your flower center. Measure it up to your petals to see how big you need it to be. Adjust your size accordingly.  17. Now you may begin placing your petals around the center. If they do not fit quite right, don't worry. Just go back and reduce your center portion. If the center portion is too small, just reduce your petals. A little at a time. 
18. As you can see I changed my mind on the center. It stuck out too much. The smaller your internal design, the less noticeable it will be. Not shown here- I wrapped a thin sheet of lavender around my center to tie it in with the petals.

19. Roll a sheet of black or a very dark version of a color you are using. I choose dark purple. Roll out on a thin setting. I used a #5 setting on my Atlas pasta machine. Cut it to the width of your cane. Wrap around the outside of your petal and trim edges.

20. Here is the flower cane almost finished! Look it over. If you want to make any changes, now is the time. If the center portion looks like it is over taking the flower, reduce it down and use less petals. You can always make another flower with them later. Or maybe you decided you don't want a flower at all. Make a five pointed star! There's about a million ways to put this cane together. Just use your imagination.


22. Now comes the fun part! Reducing! Lay your cane out horizontal. Begin pressing on it. Roll a slight turn. Press.

23. Turn, press. I am not pressing as I roll. This will result in air distortion within the cane. You simply want to turn and then press. If you notice your cane begin to get square, roll it slightly to re-shape.

24. Here is the completed cane! Hope you like it! Or at least had fun doing it. Cane work is a lot of trial and error. When starting out, use colors that will blend together nicely if it doesn't work out the way you like. For instance red & purple or green & blue. That way you don't end up with more brown clay then you want!
 |
No hay comentarios:
Publicar un comentario