

What you need:
- Scrap clay
- Shape cutters and modeling tools
- Craft knife
- Mica powder, pearl or silver
- Adirondack inks
- Texture plates
- Liquid polymer clay
- Bamboo rod or a thin paint brush
- Heat gun
Step 1:
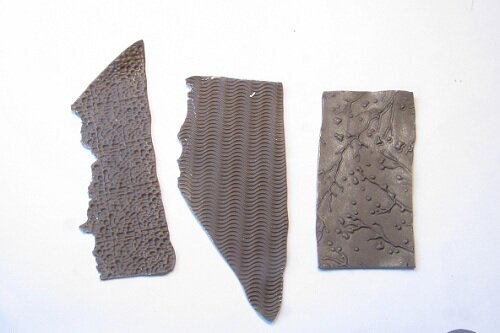
Condition some scrap clay and run it through a medium setting on your pasta machine. Cut the sheet in three and texture them with three different texture plates or stamps, preferably with small patterns. Put them aside.
Condition some scrap clay and run it through a medium setting on your pasta machine. Cut the sheet in three and texture them with three different texture plates or stamps, preferably with small patterns. Put them aside.
Step 2:
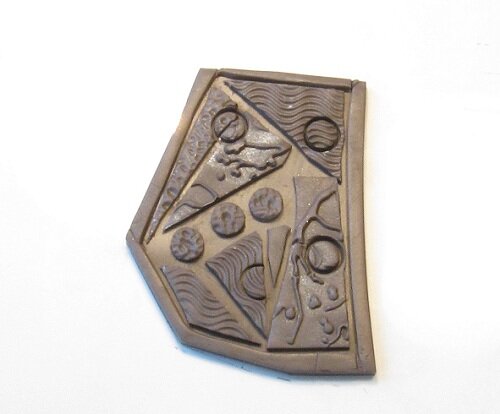
Condition some more scrap clay, and run it through on a medium setting. Cut out the shape you want the pendant to have, but a little larger than what you want the finished piece to be.
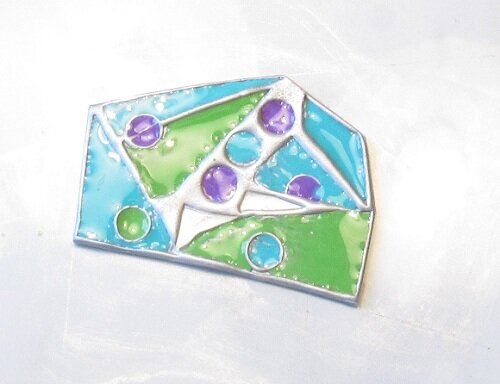
Cut pieces of the patterned sheets and apply them onto the shaped sheet. Use shape cutters to make circles or indentations. You are actually making the negative of the pendant, so all the raised parts will be the lower parts on the finished pendant and vice versa. When you are content with the pattern, put some strips around the outer edge of the pendant, so that you will have a raised edge around the finished pendant. You need this to keep the faux enamel in place so that it won’t run over the edge. When done, cure the negative for 30 minutes.
Step 3:
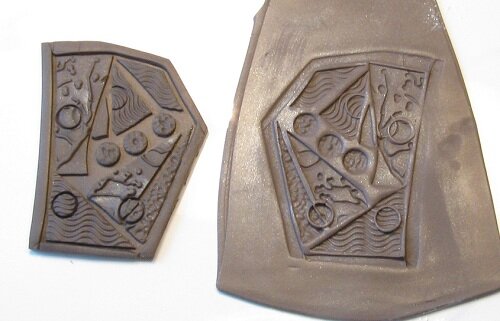
When the negative is cold, condition another sheet of scrap clay and run it through on a medium setting, like you have done above. Dust the sheet with cornstarch and press the negative onto the clay sheet. Clean cut around the edge, close to the raised edge that runs around the pendant. Smoot all rough edges. When you have added the mica powder in the next step, you will not be able to sand it without removing the metallic finish.
Step 4:
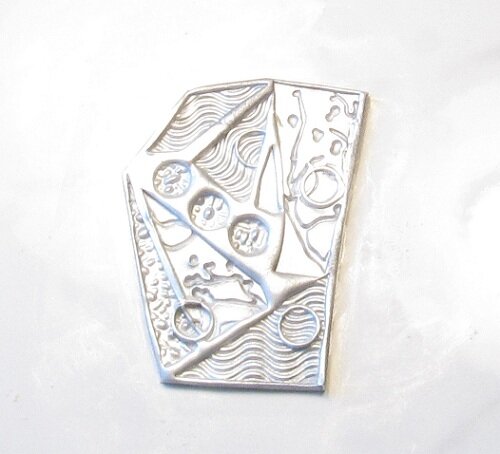
Dust the piece with mica powder or pearl ex powder. Silver or pearl will give you a light metallic surface. Cure the piece for 30 minutes and leave it to get cold.
Step 5:
You are now going to add the faux enamel. Pour some liquid polymer clay into a small cup or a paint palette. Add one drop of ink and stir it well. Do the same with the two other inks you have chosen. Use a small paint brush or a bamboo rod and fill the cells in the pendant with inked liquid clay. Do not overfill them. It is better to fill only a little and add more when needed after curing. Leave the pendant for 30 minutes or longer to have trapped air raise to the surface. Bump it on the side a couple of times, to loosen the air bubbles. Cure it for 20 minutes and leave it until it is cold.
When the pendant comes out of the oven, the liquid clay looks frosty. When the pendant is cold, heat it up again with a heat gun to make the faux enamel transparent and shiny.
Repeat step 5 one more time if needed until the cells are even with color. Finish the pendant by pouring a generous layer of liquid polymer clay without ink. This will seal the mica powder on the bridges between the cells and give you an even surface. Cure and reheat as described above. Sand the back and your faux enamel pendant is done.

No hay comentarios:
Publicar un comentario